Friday, August 10, 2018
Differences between RHEL 7 and 6
| Features | RHEL 7 | RHEL 6 |
| Default File System | XFS | EXT4 |
| Kernel Version | 3.10.x-x kernel | 2.6.x-x Kernel |
| Kernel Code Name | Maipo | Santiago |
| General Availability Date of First Major Release | 2014-06-09 (Kernel Version 3.10.0-123) | 2010-11-09 (Kernel Version 2.6.32-71) |
| First Process | systemd (process ID 1) | init (process ID 1) |
| Runlevel | runlevels are called as "targets" as shown below: runlevel0.target -> poweroff.target runlevel1.target -> rescue.target runlevel2.target -> multi-user.target runlevel3.target -> multi-user.target runlevel4.target -> multi-user.target runlevel5.target -> graphical.target runlevel6.target -> reboot.target /etc/systemd/system/default.target (this by default is linked to the multi-user target) | Traditional runlevels defined : runlevel 0 runlevel 1 runlevel 2 runlevel 3 runlevel 4 runlevel 5 runlevel 6 and the default runlevel would be defined in "/etc/inittab" file. |
| Host Name Change | In Red Hat Enterprise Linux 7, as part of the move to the new init system (systemd), the hostname variable is defined in "/etc/hostname" file. | In Red Hat Enterprise Linux 6, the hostname variable was defined in the "/etc/sysconfig/network" configuration file. |
| Change In UID Allocation | By default a new user created would get UIDs assigned starting from 1000. This could be changed in "/etc/login.defs" file if required. | Default UID assigned to users would start from 500. This could be changed in "/etc/login.defs" file if required. |
| Max Supported File Size | Maximum (individual) file size = 500TB Maximum filesystem size = 500TB (This maximum file size is only on 64-bit machines. Red Hat Enterprise Linux does not support XFS on 32-bit machines.) | Maximum (individual) file size = 16TB Maximum filesystem size = 16TB (This maximum file size is based on a 64-bit machine. On a 32-bit machine, the maximum files size is 8TB.) |
| File System Check | "xfs_repair" XFS does not run a file system check at boot time. | "e2fsck" File system check would gets executed at boot time. |
| Differences Between xfs_repair & e2fsck | "xfs_repair" - Inode and inode blockmap (addressing) checks. - Inode allocation map checks. - Inode size checks. - Directory checks. - Pathname checks. - Link count checks. - Freemap checks. - Super block checks. | "e2fsck" - Inode, block, and size checks. - Directory structure checks. - Directory connectivity checks. - Reference count checks. - Group summary info checks. |
| Difference Between xfs_growfs & resize2fs | "xfs_growfs" xfs_growfs takes mount point as arguments. | "resize2fs" resize2fs takes logical volume name as arguments. |
| Change In File System Structure | /bin, /sbin, /lib, and /lib64 are now nested under /usr. | /bin, /sbin, /lib, and /lib64 are usually under / |
| Boot Loader | GRUB 2 Supports GPT, additional firmware types, including BIOS, EFI and OpenFirmware. Ability to boot on various file systems (xfs, ext4, ntfs, hfs+, raid, etc) | GRUB 0.97 |
| KDUMP | RHEL7 supports kdump on large memory based systems up to 3 TB | Kdump doesn’t work properly with large RAM based systems. |
| System & Service Manager | "Systemd" systemd is a system and service manager for Linux, and replaces SysV and Upstart used in previous releases of Red Hat Enterprise Linux. systemd is compatible with SysV and Linux Standard Base init scripts. | Upstart |
| Enable/Start Service | For RHEL 7, the systemctl command replaces service and chkconfig. - Start Service : "systemctl start nfs-server.service". - Enable Service : To enable the service (example: nfs service ) to start automatically on boot : "systemctl enable nfs-server.service". Although one can still use the service and chkconfig commands to start/stop and enable/disable services, respectively, they are not 100% compatible with the RHEL 7 systemctl command | Using "service" command and "chkconfig" commands. - Start Service : "service start nfs" OR "/etc/init.d/nfs start" - Enable Service : To start with specific runlevel : "chkconfig --level 3 5 nfs on" |
| Default Firewall | "Firewalld (Dynamic Firewall)" The built-in configuration is located under the "/usr/lib/firewalld" directory. The configuration that you can customize is under the "/etc/firewalld" directory. It is not possible to use Firewalld and Iptables at the same time. But it is still possible to disable Firewalld and use Iptables as before. | Iptables |
| Network Bonding | "Team Driver" -/etc/sysconfig/network-scripts/ifcfg-team0 - DEVICE=”team0” - DEVICETYPE=”Team” | "Bonding" -/etc/sysconfig/network-scripts/ifcfg-bond0 - DEVICE=”bond0” |
| Network Time Synchronization | Using Chrony suite (faster time sync compared with ntpd) | Using ntpd |
| NFS | NFS4.1 NFSv2 is no longer supported. Red Hat Enterprise Linux 7 supports NFSv3, NFSv4.0, and NVSv4.1 clients. | NFS4 |
| Cluster Resource Manager | Pacemaker | Rgmanager |
| Load Balancer Technology | Keepalived and HAProxy | Piranha |
| Desktop/GUI Interface | GNOME3 and KDE 4.10 | GNOME2 |
| Default Database | MariaDB is the default implementation of MySQL in Red Hat Enterprise Linux 7 | MySQL |
| Managing Temporary Files | RHEL 7 uses systemd-tmpfiles (more structured, and configurable, method to manage tmp files and directories). | Using "tmpwatch" |
References :-
| ||
| RHEL7 Extras | ||
| Introduction of Docker | Docker is an open source project that automates the deployment of applications inside Linux Containers, and provides the capability to package an application with its run time dependencies into a container. | |
| Device Hot-plug Removed | While RHEL 5/6 has device hot-plug support (udev rule that runs the ifup script for newly created devices), it has been disabled for RHEL 7 since it can result in race conditions when initializing newly found. | |
| No 32 Bit ISO Image | No 32 bit ISO for download. Red Hat Enterprise Linux 7 will only provide 64-bit ISO's, thus allowing only a 64-bit operating environment. RHEL 7 will not natively support 32-bit hardware. | |
| "MemAvailable" Added to /proc/meminfo | A new entry to the /proc/meminfo file has been introduced to provide the MemAvailable field. MemAvailable provides an estimate of how much memory is available for starting new applications, without swapping. However, unlike the data provided by the Cache or Free fields, MemAvailable takes into account page cache and also that not all reclaimable memory slabs will be reclaimable due to items being in use. | |
| New Ruby and Python Versions | Red Hat Enterprise Linux 7 provides the latest Ruby version, 2.0.0 and Python 2.7.5. | |
| OpenJDK7 Made Default | Red Hat Enterprise Linux 7 features OpenJDK7 as the default Java Development Kit (JDK) and Java 7 as the default Java version. | |
| More Powerful NetworkManager | NetworkManager has been significantly enhanced to configure and monitor all the networking features for enterprise class servers and for desktop applications. For the enterprise data centers, NetworkManager can be used for tasks such as basic networking configuration, network teaming, configuring virtual LANs, bridges, bonds, IPv6, VPNs, assigning interfaces to firewall zones, and others. For desktop servers it can manage wired and wireless networks and VPNs. | |
| Support for 40 Gigabit NICs | Red Hat Enterprise Linux 7 supports 40 Gigabit network interface controllers (NICs) from multiple hardware partners. This provides support for 40 Gigabit Ethernet link speeds enabling faster network communication for applications and systems. Note that the ethtool utility will report interface link speeds up to 40Gb data rates. | |
| No RHN Classic | RHN Classic is not supported in RHEL7. Older versions supported different subscription management methods. Red Hat Subscription Management is the only one used by RHEL 7. | |
| OpenSSH - Multiple Required Authentications | Red Hat Enterprise Linux 7 supports multiple required authentications in SSH protocol version 2 using the AuthenticationMethods option. This option lists one or more comma-separated lists of authentication method names. Successful completion of all the methods in any list is required for authentication to complete. | |
| Minimum Disk Space for Installation of RHEL7 | Red Hat Enterprise Linux 7 now requires at least 1 GB of disk space to install. However, Red Hat recommends a minimum of 5 GB of disk space for all supported architectures. | |
| Implementation of tmpfs file system | Red Hat Enterprise Linux 7 offers the ability to use /tmp as a mount point for a temporary file storage system (tmpfs). When enabled, this temporary storage appears as a mounted file system, but stores its content in volatile memory instead of on a persistent storage device. No files in /tmp are stored on the hard drive except when memory is low, in which case swap space is used. This means that the contents of /tmp are not persisted across a reboot. | |
| In-place upgrade, now supported | Now, in-place upgrade from RHEL 6 is supported to RHEL 7 (Reference: https://access.redhat.com/solutions/637583). | |
| Dracut used by Anaconda | Anaconda would use "Dracut" to configure disks during installation (GUI) in RHEL 7.x which was earlier performed by utility called "disk druid". | |
| New Logging Framework | Red Hat Enterprise Linux 7 introduces a new logging daemon, journald, as part of the move to systemd. journald captures the following types of message for all services: - syslog messages - kernel messages - initial RAM disk and early boot messages - messages sent to standard output and standard error output. | |
| Samba 4 fully supported | RHEL 7 provides Samba 4, bundle of utilities, features, python bindings which allows communications using SMB1, SMB2 & SMB3 protocols. In RHEL 6.4 and later versions, Samba 4 was provided as Technology Preview. | |
| Non-root user process limitations | In RHEL 6.x, non-root users were resitricted to a total of 1024 processes per PAM session. In RHEL 7.x, this has been increased to 4096 processes per PAM session by default. | |
| PCS replaces luci | The high availability management agent "luci" has been replaced by "pcs" in RHEL 7. Now, "pcs" can controls pacemaker-based clusters only, not rgmanager-based cluster setups. | |
| Default IO Scheduler | "deadline" is now the default IO scheduler in RHEL 7.x (except SATA drives) which was earlier "cfq" by default. | |
| Changes to mount options | Unlike ext3 and ext4, the XFS file system enables the user_xattr and acl mount options by default. Ext3 and ext4 file systems do not enable these attributes by default. | |
How to Connect Windows machine with RDP from CentOS 7 / RHEL 7 Console
Install freerdp on CentOS 7 / RHEL 7
Let’s first install Desktop environment related packages using the beneath yum command. If we don’t install these packages then xfreerdp command will not work from command line
Once the freerdp is installed successfully then we have ‘xfreerdp’ command through we can connect to windows machine. Disconnect ssh session of your server and connect it again with ‘-X’ option. Example is shown below
‘ssh root@192.168.1.60 -X‘
Connect to Windows Machine with RDP from CentOS 7 / RHEL 7 Console or terminal
Run the below ‘xfreerdp’ command, replace the user name and ip address and screen resolution as per your setup.
Maria DB not starting
Maria DB not starting. Job for mariadb.service failed. See 'systemctl status mariadb.service' and 'journalctl -xn' for details
[root@localhost ~]# systemctl restart mariadb.service
Job for mariadb.service failed because the control process exited with error code. See "systemctl status mariadb.service" and "journalctl -xe" for details.
ok
STEP 1.
[root@localhost lib]# yum remove mariadb-server
STEP 2.
[root@localhost lib]# rm -rf /var/lib/mysql
STEP 3.
[root@localhost lib]# yum install mariadb-server
STEP 4.
[root@localhost lib]# systemctl start mariadb.service
[root@localhost lib]# mysql -u root -p
Thursday, August 9, 2018
Install KVM Hypervisor on CentOS 7
Install KVM Hypervisor on CentOS 7
KVM is an open source hardware virtualization software through which we can create and run multiple Linux based and windows based virtual machines simultaneously. KVM is known as Kernel based Virtual Machine because when we install KVM package then KVM module is loaded into the current kernel and turns our Linux machine into a hypervisor.
In this post first we will demonstrate how we can install KVM hypervisor on CentOS 7.x and RHEL 7.x and then we will try to install virtual machines.
Before proceeding KVM installation, let’s check whether your system’s CPU supports Hardware Virtualization.
Run the beneath command from the console.
We should get the word either vmx or svm in the output, otherwise CPU doesn’t support virtualization.
Step:1 Install KVM and its associate packages
Run the following yum command to install KVM and its associated packages.
Start and enable the libvirtd service
Run the beneath command to check whether KVM module is loaded or not
In Case you have Minimal CentOS 7 and RHEL 7 installation , then virt-manger will not start for that you need to install x-window package.
Reboot the Server and then try to start virt manager.
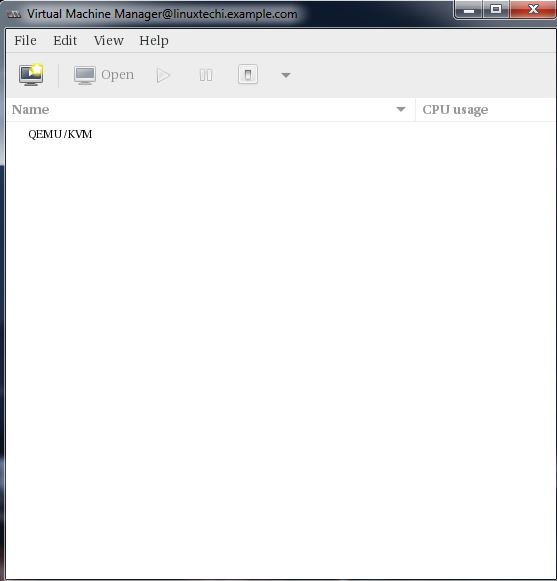
Step:2 Start the Virt Manager
Virt Manager is a graphical tool through which we can install and manage virtual machines. To start the virt manager type the ‘virt-manager‘ command from the terminal.
Step:3 Configure Bridge Interface
Before Start creating VMs , let’s first create the bridge interface. Bridge interface is required if you want to access virtual machines from outside of your hypervisor network.
Edit the Interface file and set followings:
Edit the Bridge file (ifcfg-br0) and set the followings:
Replace the IP address and DNS server details as per your setup.
Restart the network Service to enable the bridge interface.
Check the Bridge interface using below command :
Step:4 Start Creating Virtual Machines.
Now Create Virtual Machine either from the command line using ‘virt-install‘ command or from GUI (virt-manager )
Let’s Create a virtual machine of “Windows Server 2012 R2” using virt-manager.
Start the “virt-manager”
Go to the File Option, click on “New Virtual Machine”
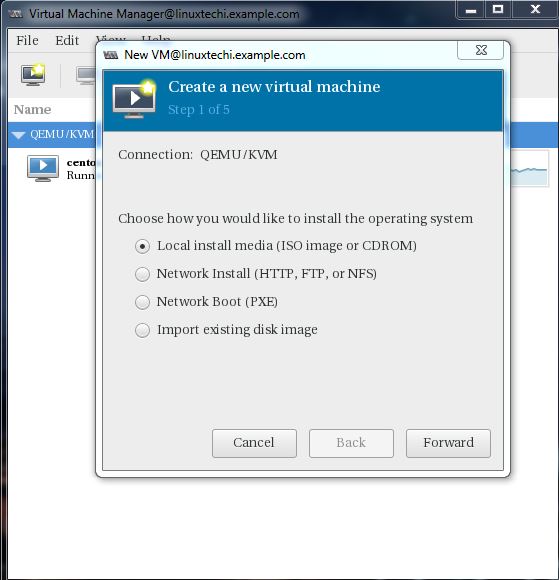
We will be using ISO file as installation media. In the next step Specify the path of ISO file.
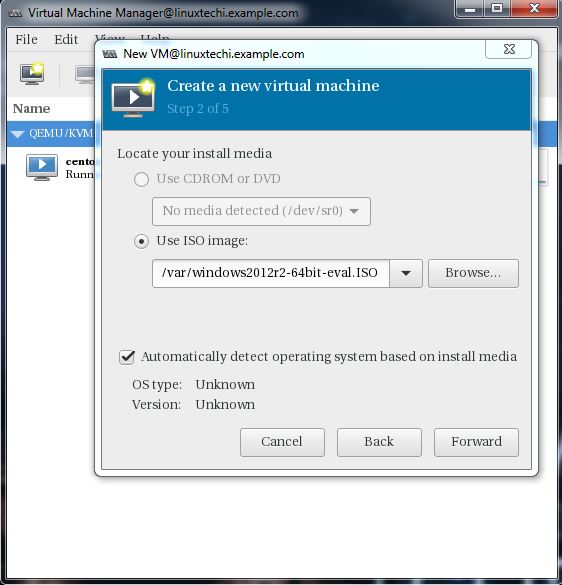
Click on Forward.
Specify the Compute Resources : RAM and CPU as per your setup.
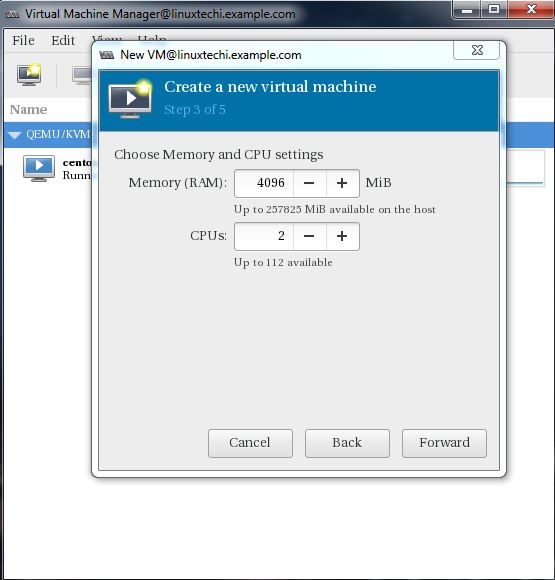
Click on Forward to proceed further.
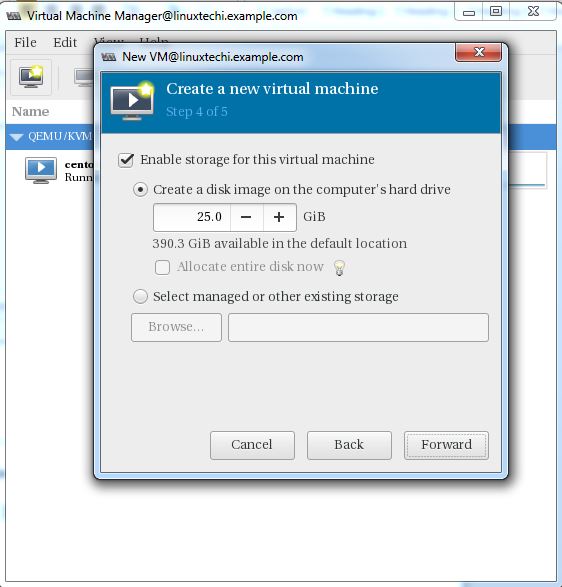
Specify the storage Size of Virtual Machine, In my case I am using 25G.
In the Next step Specify the Name of Virtual Machine and select network as ‘ Bridge bro’
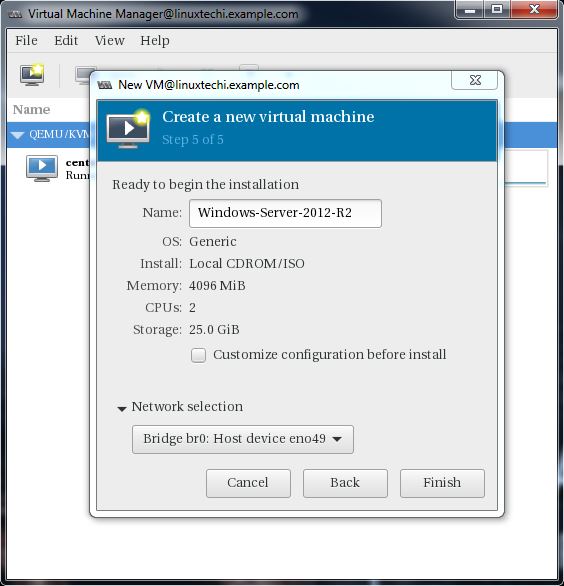
Click on Finish to start the installation.
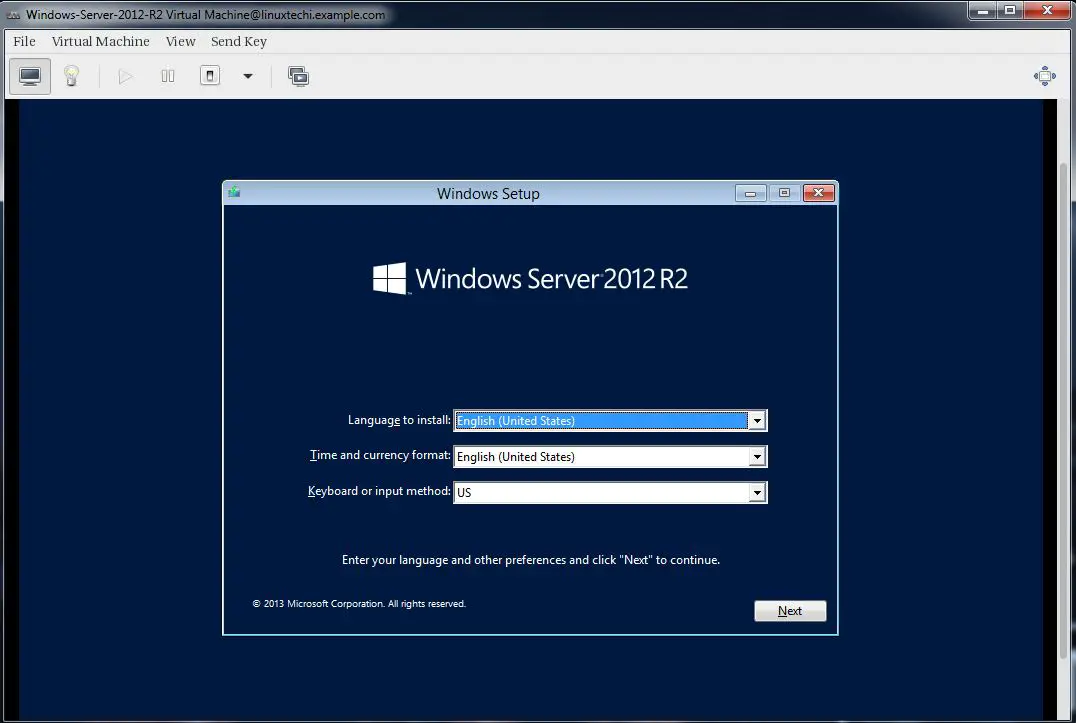
Follow the screen instructions and complete the installation.
Creating a virtual Machine from Command Line:
Virtual Machines can be created from the console as well using ‘virt-install’ command. In the following example i going to virtual machine of Ubuntu 16.04 LTS.
Subscribe to:
Comments (Atom)